Honeywell Pro 1000 Thermostat Troubleshooting : Mastering Temperature Control
If you are experiencing issues with your Honeywell Pro 1000 thermostat, follow these troubleshooting steps. Are you having trouble with your Honeywell Pro 1000 thermostat?
Don’t worry, we’ve got you covered. In this guide, we will walk you through some common troubleshooting steps to help you resolve any issues you may be experiencing. By following these steps, you can get your thermostat back up and running smoothly in no time.
Whether it’s a display issue, temperature discrepancy, or connectivity problem, we have solutions to address these common problems. Let’s dive in and get your Honeywell Pro 1000 thermostat working effectively again.
Understanding The Honeywell Pro 1000 Thermostat
Common Issues And Troubleshooting Steps
When it comes to maintaining optimal temperature control in your home or office, the Honeywell Pro 1000 Thermostat is a reliable choice. This thermostat offers a range of key features and functionalities that make it easy to set and adjust your desired temperature with precision. In this article, we will explore the various aspects of the Honeywell Pro 1000 Thermostat, from its important features and functionality to the significance of proper temperature control.
Key Features and Functionality
The Honeywell Pro 1000 Thermostat boasts several key features that set it apart from other thermostats on the market. Let’s take a closer look at what makes this thermostat stand out:
- User-Friendly Interface: The Pro 1000 features a simple yet intuitive interface, making it easy for users of all levels of technical expertise to navigate and operate.
- Precise Temperature Control: With this thermostat, you have precise control over your desired temperature settings. The Pro 1000 allows you to set temperature differentials and select setback options, ensuring comfort and energy efficiency.
- Energy-Saving Mode: The Pro 1000 comes equipped with an energy-saving mode that automatically adjusts temperature settings to conserve energy when you’re away from home.
- Compatibility: Whether you have a single-stage heating system or a single-stage cooling system, the Pro 1000 is compatible with a wide range of heating and cooling systems, making it a versatile choice for any space.
- Accuracy: This thermostat is renowned for its accuracy in temperature sensing. With its precise temperature control, you can trust that your indoor climate will always be comfortable.
Importance of Proper Temperature Control
Proper temperature control is of utmost importance when it comes to creating a comfortable and energy-efficient environment. Here’s why it matters:
- Comfort: Maintaining a consistent and comfortable temperature ensures that you and your family or colleagues can enjoy a pleasant indoor climate all year round.
- Energy Efficiency: By setting your thermostat to the appropriate temperature, you can reduce energy waste and lower your utility bills. The Honeywell Pro 1000 Thermostat helps ensure energy efficiency with its precise temperature control and energy-saving mode.
- Health and Well-being: Extreme temperatures can have a negative impact on your health and well-being. With proper temperature control, you can create a space that promotes optimal health and productivity.
- Equipment Performance: The right temperature control not only benefits you but also helps maintain the longevity and performance of your heating and cooling systems. By avoiding temperature extremes and ensuring consistent operation, you can prolong the lifespan of your equipment.
Overall, the Honeywell Pro 1000 Thermostat offers a range of features and functionalities that make it a top choice for temperature control. By understanding its capabilities and the importance of proper temperature control, you can create a comfortable and energy-efficient environment for yourself and those around you.
If you’re experiencing issues with your Honeywell Pro 1000 thermostat, don’t panic! In this section, we’ll discuss the most common problems users encounter and provide troubleshooting steps to help you resolve them. Whether your thermostat isn’t turning on or off, displaying incorrect temperature readings, or providing inconsistent temperature control, we’ve got you covered. Let’s dive in!
Thermostat not turning on/off
If your Honeywell Pro 1000 thermostat isn’t turning on or off properly, there could be a few potential causes. Here are some troubleshooting steps you can follow to address the issue:
- Check the power source: Ensure that your thermostat is receiving power. Verify if your thermostat is battery operated or connected to the electrical system. If it requires batteries, replace them with fresh ones. For electrical systems, check if the circuit breaker is functioning correctly.
- Check the thermostat settings: Make sure the thermostat is set to the desired temperature and mode (heating or cooling). Ensure that the temperature settings are properly programmed to determine when the system should turn on or off.
- Check the wiring: Inspect the wiring connections at your thermostat and the HVAC system. Ensure the wires are securely connected and undamaged.
- Reset the thermostat: Try resetting the thermostat. Locate the reset button or switch on your thermostat and press or toggle it accordingly. This can sometimes resolve minor glitches or software errors.
Incorrect temperature readings
If your Honeywell Pro 1000 thermostat is displaying incorrect temperature readings, you might need to troubleshoot the following:
- Calibrate the thermostat: Verify the accuracy of the thermostat’s temperature readings by comparing them to an external thermometer. If there’s a discrepancy, you may need to recalibrate the thermostat. Refer to the user manual for instructions on how to perform this task.
- Check for sensor obstructions: Inspect the thermostat to ensure there are no obstructions blocking the temperature sensor. Make sure no objects like curtains or furniture are preventing accurate temperature detection.
- Clean the thermostat: Over time, dust and debris can accumulate on the thermostat’s sensor, affecting its ability to read temperatures accurately. Gently clean the sensor using a soft cloth or a brush, making sure not to damage any delicate components.
Inconsistent temperature control
If your Honeywell Pro 1000 thermostat is providing inconsistent temperature control, try the following troubleshooting steps:
- Check for air leaks: Inspect your home for air leaks around windows, doors, and other openings. Inadequate insulation or drafts can lead to inconsistent temperature control. Seal any leaks you find to improve efficiency.
- Ensure proper ventilation: Make sure there are no obstructions blocking airflow to the thermostat or vents. Restricted airflow can affect the thermostat’s ability to regulate the temperature effectively.
- Verify HVAC system compatibility: Ensure that your HVAC system is compatible with the Honeywell Pro 1000 thermostat. Check the manufacturer’s specifications or consult a professional if needed.
- Consider professional assistance: If the issue persists after attempting these troubleshooting steps, it may be best to contact a professional HVAC technician. They can diagnose and resolve any underlying issues with your system or thermostat.
By following these troubleshooting steps, you should be able to address common issues with your Honeywell Pro 1000 thermostat. Remember, if you’re unsure or uncomfortable performing any of these steps, it’s always recommended to seek professional assistance for proper diagnosis and resolution.
Advanced Troubleshooting Techniques
When it comes to dealing with issues related to your Honeywell Pro 1000 thermostat, there are several advanced troubleshooting techniques that can help you identify and resolve the problem. By following these steps, you can save time and money on professional repairs. In this section, we will explore four key techniques: resetting the thermostat, checking the wiring connections, calibrating temperature sensors, and upgrading firmware for improved performance.
Resetting the thermostat
If you are experiencing erratic behavior or unresponsive controls, resetting the thermostat may help resolve the issue. To do this, follow these simple steps:
- Locate the thermostat’s reset button.
- Using a small object like a paperclip or pin, gently press and hold the reset button.
- Keep the button pressed for about 5 seconds or until you see the thermostat’s screen go blank.
- Release the reset button and wait for the thermostat to restart.
By performing a reset, you can clear any temporary glitches or errors that may have been affecting the thermostat’s performance.
Checking the wiring connections
Incorrect or loose wiring connections can disrupt the functionality of your thermostat. To ensure everything is properly connected, follow these steps:
- Turn off the power supply to your thermostat by switching off the circuit breaker or removing the fuse.
- Remove the thermostat cover to access the wiring.
- Inspect each wire connection to ensure they are securely fastened.
- If you notice any loose or damaged wires, carefully reconnect or replace them.
- Once all the connections are secure, replace the thermostat cover and restore power.
By checking and fixing any wiring issues, you can eliminate one potential cause of malfunctioning.
Calibrating temperature sensors
Over time, temperature sensors can become inaccurate, leading to improper temperature readings. Calibrating the sensors can help ensure accurate temperature control. Here’s how:
- Access the thermostat’s menu settings by pressing the menu button.
- Navigate to the temperature calibration option using the arrow buttons.
- Adjust the temperature up or down until it matches a known accurate thermometer.
- Save the settings and exit the menu.
By calibrating the temperature sensors, you can enhance the precision of your thermostat’s temperature readings.
Upgrading firmware for improved performance
To take advantage of the latest performance enhancements and bug fixes, it’s important to keep your thermostat’s firmware up to date. Follow these steps to upgrade the firmware:
- Visit the Honeywell website and locate the firmware update for your model.
- Download the firmware update file to your computer.
- Connect a USB flash drive to your computer and copy the firmware update file onto it.
- Insert the USB drive into the USB port on your thermostat.
- Access the thermostat’s menu settings and navigate to the firmware update option.
- Select the firmware update option and follow the on-screen instructions to initiate the update.
- Once the update is complete, restart the thermostat.
By keeping your thermostat’s firmware updated, you can ensure optimal performance and compatibility with new features and technologies.
Optimizing Energy Efficiency With Honeywell Pro 1000 Thermostat
Optimizing Energy Efficiency with Honeywell Pro 1000 Thermostat
Setting Temperature Schedules
One of the key features of the Honeywell Pro 1000 Thermostat is its ability to help you set temperature schedules that optimize energy efficiency. By setting different temperatures for different times of the day, you can ensure that your heating or cooling system is only operating when it’s actually needed. This can lead to significant energy savings over time.
Utilizing Setback and Recovery Features
The Honeywell Pro 1000 Thermostat also offers setback and recovery features that further enhance energy efficiency. Setback allows you to lower the temperature during times when you are away from home or during the night when you are sleeping. This feature helps to reduce energy consumption by minimizing the workload of your HVAC system when it’s not needed.
Additionally, the recovery feature allows the thermostat to “learn” how long it takes for your home to reach the desired temperature after setback. By utilizing this feature, the thermostat can start heating or cooling your home in advance, ensuring that it reaches the desired temperature at the scheduled time, without wasting unnecessary energy.
Understanding How Temperature Affects Energy Usage
It’s important to understand how temperature affects energy usage in order to optimize energy efficiency with the Honeywell Pro 1000 Thermostat. When your HVAC system has to work harder to maintain a specific temperature, it consumes more energy. By setting appropriate temperature schedules and utilizing setback and recovery features, you can keep energy consumption in check and achieve maximum efficiency.
It’s worth noting that even small adjustments to temperature can have a significant impact on energy usage. For example, raising the temperature by just a few degrees during the cooling season can lead to substantial savings in energy costs.
By using the Honeywell Pro 1000 Thermostat and following these energy-saving practices, you can enjoy a comfortable living environment while minimizing your carbon footprint and reducing your energy expenses.
Enhancing Comfort With The Honeywell Pro 1000 Thermostat
Adjusting Temperature Differentials
One of the key features of the Honeywell Pro 1000 Thermostat is its ability to adjust temperature differentials, allowing for precise control over your home’s comfort levels. With this thermostat, you can set the temperature differential between heating and cooling modes, ensuring that the transition is seamless and comfortable. By customizing this setting, you can eliminate sudden temperature fluctuations, providing a more consistent and pleasant indoor environment for you and your family.
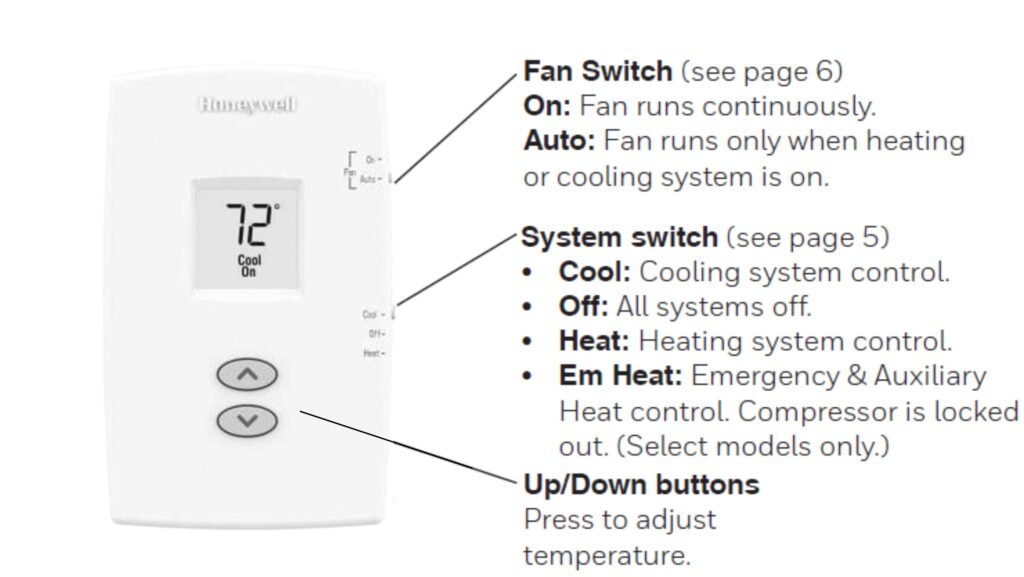
Utilizing Fan Circulation Modes
Another way to enhance comfort with the Honeywell Pro 1000 Thermostat is by utilizing its fan circulation modes. With this thermostat, you have the option to manually or automatically control the fan operation. By running the fan continuously, you can ensure better air distribution throughout your home, preventing any hot or cold spots. This is particularly useful if you have a multi-level home or rooms that are typically harder to cool or heat. With the Honeywell Pro 1000 Thermostat, you can tailor the fan operation to your specific needs, promoting a more comfortable living environment.
Customizing Temperature Preferences
With the Honeywell Pro 1000 Thermostat, you have the power to customize your temperature preferences, ensuring that your home is always at the perfect temperature for you. Whether you prefer cooler temperatures during the summer or warmer ones during the winter, this thermostat allows you to easily adjust and fine-tune the temperature settings. By creating personalized temperature preferences, you can enjoy the utmost comfort in your home, all year round.
Overall, the Honeywell Pro 1000 Thermostat offers a range of features designed to enhance your comfort. From adjusting temperature differentials to utilizing fan circulation modes and customizing temperature preferences, this thermostat puts you in control of your home’s climate. Say goodbye to discomfort and hello to the perfect indoor environment with the Honeywell Pro 1000 Thermostat.
Credit: www.sourcesecurity.com
Integrating The Honeywell Pro 1000 Thermostat With Other Smart Home Devices
If you’re looking to make your home smarter and more efficient, integrating the Honeywell Pro 1000 Thermostat with other smart home devices is a fantastic option. This thermostat is compatible with various smart home systems, allowing you to streamline and control your entire home environment from one central hub. In this guide, we will explore the compatibility of the Honeywell Pro 1000 Thermostat with smart home systems, discuss the benefits of integration, and provide you with step-by-step instructions on how to seamlessly integrate your thermostat with other smart devices.
Compatibility with smart home systems
The Honeywell Pro 1000 Thermostat is designed to work seamlessly with popular smart home systems, allowing you to create a smart home ecosystem that suits your needs. Whether you have a Google Nest, Amazon Alexa, Apple HomeKit, or other smart home system, chances are the Honeywell Pro 1000 Thermostat can integrate with it. This compatibility ensures that no matter which platform you prefer, you can easily manage and control your home’s temperature and energy usage with ease.
To determine if your smart home system is compatible with the Honeywell Pro 1000 Thermostat, refer to the manufacturer’s instructions or the product specifications of your smart home system. If it is compatible, you’re one step closer to enjoying the benefits of integration.
Benefits of integrating the thermostat
Integrating the Honeywell Pro 1000 Thermostat with other smart home devices offers numerous benefits. Here are some advantages you can expect:
- Remote control: By integrating the thermostat with your smart home system, you gain the ability to control and adjust the temperature of your home remotely. Whether you’re sitting on the couch or miles away, you can easily monitor and adjust the thermostat through your smartphone or smart speaker.
- Energy efficiency: Smart home integration allows you to optimize your home’s energy usage. By automating temperature adjustments based on occupancy or time of day, you can reduce energy waste and save money on your utility bills.
- Seamless automation: Linking your thermostat with other smart devices enables seamless automation. For example, you can program your thermostat to adjust the temperature when you unlock your smart lock or turn off your smart lights, creating a truly integrated and convenient smart home experience.
- Personalization: Integration enables personalized settings that cater to individual preferences. You can create custom schedules, set temperature limits, and even receive personalized energy-saving recommendations, all tailored to your lifestyle and needs.
Step-by-step instructions for integration
- Ensure compatibility: Confirm that your smart home system is compatible with the Honeywell Pro 1000 Thermostat.
- Install the thermostat: Follow the manufacturer’s instructions to install and set up the Honeywell Pro 1000 Thermostat.
- Access your smart home system’s app or platform: Use your smartphone or computer to access the app or platform associated with your smart home system.
- Add the thermostat: Within the app or platform, locate the option to add a new device or accessories. Follow the on-screen instructions, and when prompted, select the Honeywell Pro 1000 Thermostat from the list of compatible devices.
- Complete the pairing process: The app or platform will guide you through the pairing process, which typically involves connecting to the thermostat’s Wi-Fi network and entering a unique code or password.
- Customize settings: Once the pairing is complete, you can now customize the thermostat’s settings, including setting up schedules, adjusting temperature thresholds, and exploring additional features offered by the smart home system.
- Enjoy your integrated smart home experience: With the thermostat successfully integrated, you can now control and monitor your home’s temperature through your smart home system’s app or platform, as well as through voice commands if applicable.
Integrating the Honeywell Pro 1000 Thermostat with other smart home devices opens up a world of convenience, energy savings, and customization. Follow the above step-by-step instructions to seamlessly integrate your thermostat and enjoy the benefits of a truly integrated smart home.
Routine Maintenance For Optimal Performance
Maintaining your Honeywell Pro 1000 Thermostat is crucial in ensuring its optimal performance and longevity. Routine maintenance not only enhances its efficiency but also prevents potential issues down the line. By following these simple steps, you can keep your thermostat running smoothly and hassle-free.
Cleaning the thermostat
Regularly cleaning your thermostat is an essential part of routine maintenance. A clean thermostat not only improves its overall appearance but also prevents dust and debris buildup that can affect its functionality. To clean your Honeywell Pro 1000 Thermostat, follow these steps:
- Turn off power to the thermostat.
- Gently remove the thermostat cover by carefully prying it open with a small screwdriver.
- Using a soft cloth or a cotton swab, wipe away any dust or dirt on the thermostat components. Be careful not to apply too much pressure or use any liquids that could damage the device.
- Once you have thoroughly cleaned the thermostat, replace the cover and ensure it snaps back into place securely.
- Turn the power back on and verify that the thermostat is working correctly.
Checking battery life and replacing batteries
Regularly checking the battery life of your Honeywell Pro 1000 Thermostat is essential to avoid unexpected shutdowns and ensure uninterrupted operation. To check the battery life and replace batteries if needed, follow these steps:
- Turn off the thermostat.
- Remove the thermostat cover as mentioned in the previous section.
- Locate the battery compartment and inspect the batteries for signs of corrosion or discharge.
- If the batteries are low or showing signs of deterioration, remove them and replace them with fresh, high-quality batteries. Ensure you insert the batteries correctly, respecting the polarity indicated by the markings.
- Put the thermostat cover back in place, ensuring it is securely attached.
- Turn the power on and verify that the thermostat is functioning as expected.
Updating software/firmware
Regularly updating the software or firmware of your Honeywell Pro 1000 Thermostat is essential to access the latest features and bug fixes. To update the software and ensure your thermostat is up to date, follow these steps:
- Access the official Honeywell website and navigate to the support section.
- Search for the specific model of your thermostat and locate the software or firmware update available for download.
- Follow the instructions provided by Honeywell to download and install the update onto your thermostat.
- Once the update is installed, restart the thermostat and verify that the new software or firmware is functioning correctly.
By performing these routine maintenance tasks, you can maximize the performance and longevity of your Honeywell Pro 1000 Thermostat. Remember to consult the user manual for specific instructions related to your thermostat model and always exercise caution when handling the device.
Common Troubleshooting Scenarios And Solutions
When it comes to troubleshooting your Honeywell Pro 1000 Thermostat, understanding common issues and their solutions can save you time and frustration. In this section, we will explore three common scenarios that users may encounter with their thermostat, including thermostat not connecting to Wi-Fi, display screen issues, and issues with programming or scheduling. We’ll also provide step-by-step troubleshooting tips for each scenario.
Thermostat not connecting to Wi-Fi
If you’re having trouble connecting your Honeywell Pro 1000 Thermostat to Wi-Fi, it’s important to start with the basics. Follow these troubleshooting steps:
- Ensure that your Wi-Fi network is working properly by checking other devices.
- Verify that your thermostat is within range of your Wi-Fi router.
- Check if the Wi-Fi signal strength on your thermostat is weak. If so, consider moving your router closer to the thermostat or using a Wi-Fi extender to enhance the signal.
- Reboot your thermostat by removing it from its wall mount and disconnecting it from the power source. Wait for a few seconds before reconnecting it.
- Reset the Wi-Fi settings on your thermostat by navigating to the menu, selecting “Wi-Fi,” and choosing “Reset Wi-Fi.” Follow the on-screen prompts to reconnect to your Wi-Fi network.
Display screen issues
If you’re experiencing issues with the display screen on your Honeywell Pro 1000 Thermostat, these troubleshooting steps can help:
- Check if the thermostat is receiving power. Ensure that it is securely connected to the wall mount and that the power source is functioning correctly.
- Clean the display screen using a soft, lint-free cloth. Avoid using harsh chemicals or abrasive materials that may damage the screen.
- Adjust the screen brightness by navigating to the menu, selecting “Settings,” and choosing “Display Settings” or a similar option. Increase or decrease the brightness as desired.
- Perform a factory reset on your thermostat if the display screen issues persist. Refer to the user manual or Honeywell’s website for specific instructions on how to perform a factory reset.
Issues with programming or scheduling
If you’re having trouble with programming or scheduling on your Honeywell Pro 1000 Thermostat, try these troubleshooting steps:
- Ensure that the current time and date on your thermostat are accurate. If not, adjust them accordingly.
- Double-check your programmed schedule to ensure that it matches your desired settings. Make any necessary adjustments using the thermostat’s programming options.
- If you’re experiencing scheduling conflicts or unexpected temperature changes, review your thermostat’s programming modes (e.g., “Home,” “Sleep,” “Away”) and make sure they are correctly configured.
- Consider resetting your thermostat to its default settings and reprogramming it from scratch. This can help resolve any programming issues or conflicts.
By following these troubleshooting steps for common scenarios such as thermostat not connecting to Wi-Fi, display screen issues, and issues with programming or scheduling, you can address problems with your Honeywell Pro 1000 Thermostat effectively. If the issues persist, it’s recommended to consult the user manual or contact Honeywell’s customer support for further assistance.
Frequently Asked Questions (Faqs)
If you’re having trouble with your Honeywell Pro 1000 Thermostat, you’re not alone. Luckily, we’ve gathered some of the most frequently asked questions about troubleshooting the thermostat to help you out. Whether you need to know if you can install it yourself or how to access advanced settings, we’ve got you covered. Keep reading for answers to these common questions and more.
Can I install the Honeywell Pro 1000 Thermostat myself?
Yes, you can install the Honeywell Pro 1000 Thermostat yourself. The installation process is straightforward and doesn’t require professional help. However, it’s important to follow the installation instructions provided by Honeywell to ensure a smooth and successful installation. Before you begin, make sure to turn off the power to your HVAC system to ensure your safety. Once installed, you’ll be able to start enjoying the benefits of your new thermostat right away.
How do I access advanced settings on the thermostat?
To access the advanced settings on your Honeywell Pro 1000 Thermostat, follow these steps:
- Press and hold the Menu button on the thermostat for about 5 seconds.
- Navigate through the menu options using the Up and Down buttons until you find the Advanced Settings option.
- Press the Select button to enter the advanced settings menu.
- Use the Up and Down buttons to navigate through the advanced settings and make any desired changes.
- Once you’ve made your changes, press the Done button to save the settings and exit the advanced settings menu.
By accessing the advanced settings, you’ll have more control over the functionality of your thermostat and be able to customize it to your specific needs.
Are there any known compatibility issues with certain HVAC systems?
Honeywell Pro 1000 Thermostat is compatible with most standard HVAC systems. However, there are some compatibility considerations to keep in mind. The thermostat works best with single-stage heating and cooling systems. It may not be compatible with multi-stage or heat pump systems. Additionally, it’s important to check the voltage requirements of your HVAC system to ensure compatibility. If you have any doubts or questions about compatibility, it’s always a good idea to consult the thermostat’s user manual or contact Honeywell’s customer support for assistance.
How often should I replace the thermostat batteries?
It’s recommended to replace the batteries in your Honeywell Pro 1000 Thermostat once a year or when the low battery indicator appears on the screen. This will ensure that your thermostat continues to function properly and avoid any interruptions in temperature control. To replace the batteries, follow these steps:
- Remove the thermostat from the wall by pulling it straight towards you.
- Open the battery compartment located on the back of the thermostat.
- Remove the old batteries and dispose of them properly.
- Insert new AA alkaline batteries into the battery compartment, making sure to align the positive and negative ends correctly.
- Close the battery compartment and reattach the thermostat to the wall.
Remember to ensure the batteries are properly disposed of and follow any local regulations for battery recycling.
With these frequently asked questions about Honeywell Pro 1000 Thermostat troubleshooting answered, you’ll be well-equipped to resolve any issues you may encounter and make the most out of your thermostat’s capabilities. If you have any other questions or concerns, don’t hesitate to reach out to Honeywell’s customer support for further assistance.
Frequently Asked Questions On Honeywell Pro 1000 Thermostat Troubleshooting
How Do I Reset My Honeywell Pro 1000 Thermostat?
To reset your Honeywell Pro 1000 thermostat, follow these steps: 1. Press and hold the “Program” button for about 5 seconds. 2. The screen will display “Reset? ” And you’ll need to confirm by pressing “Yes”. 3. The thermostat will now return to its default settings and you can set it up again.
Remember to refer to the user manual for detailed instructions.
Why Is My Honeywell Thermostat Not Working Properly?
A malfunctioning Honeywell thermostat may be due to various issues, such as incorrect settings or a faulty thermostat.
How Do You Know When Your Honeywell Thermostat Is Going Bad?
You can tell if your Honeywell thermostat is going bad if it starts displaying wrong temperatures or if it doesn’t respond to temperature changes.
How Do I Reset My Honeywell Thermostat Manually?
To manually reset your Honeywell thermostat, locate the reset button and press it.
Conclusion
Troubleshooting issues with your Honeywell Pro 1000 thermostat doesn’t have to be a daunting task. By following the steps outlined in this blog post, you can effectively identify and resolve common problems that may arise. Remember to first check for simple issues such as low battery power or improper settings before moving on to more complex solutions.
Utilizing the online resources and customer support provided by Honeywell can also be incredibly helpful in resolving any lingering concerns. Taking the time to troubleshoot and resolve issues with your thermostat not only ensures optimal functioning but can also contribute to energy efficiency and cost savings.
By staying informed and proactive, you can keep your Honeywell Pro 1000 thermostat running smoothly and enjoy the benefits of a comfortable and well-regulated home environment.